Aaron Liew's Blog

Blog about Android Development

Android Annotation

Android Annotation(AA) is framework that facilitate the writing and the maintenance of Android Applications, and greatly simplifies the code. It generates subclasses at compile time, for example, the subclass of the MainActivity class would be MainActivity_. To understand how the AA works, you can have a look at the subclass of the Activity.

How to enhance Android Code with AA

I would like to discuss the common annotations that would be used in Android Development.

Add @EActivity with layout id at the top of the class to replace setContentView of the Activity Class

1
2
@EActivity(R.layout.sliding_menu)
public class BaseActivity extends ActionBarActivity

Add @ViewById to replace findViewById

1
2
@ViewById(R.id.drawer_layout)
DrawerLayout mDrawerLayout;

Add @Bean to inject the activity context into class

1
2
@Bean
GlobalApplication globalApplication;

Add @AfterView before method to do something after view injection, for example, setText, setBackground, etc..

1
2
@AfterViews
public void initLayout()

Add @Click method with view’s id to handle OnClickListener.

1
2
@Click(R.id.about_us_linearLayout)
public void ClickAboutUs()

That’s it. There is no need to do “findViewById” to get the view then followed by setOnClickListener.

Want to run a thread? Add @Background above the method

1
2
@Background
public void DownloadAndSetImage()

Initiate the Layoutinflator using @SystemService

1
2
@SystemService
LayoutInflater inflator;

Add EBean at the top of the CLass in order to use available annotations

1
2
@EBean
public class GlobalApplication

Add @RootContext to inject the context into the class

1
2
@RootContext
static Context context;

RxAndroid

What is Reactive Java?

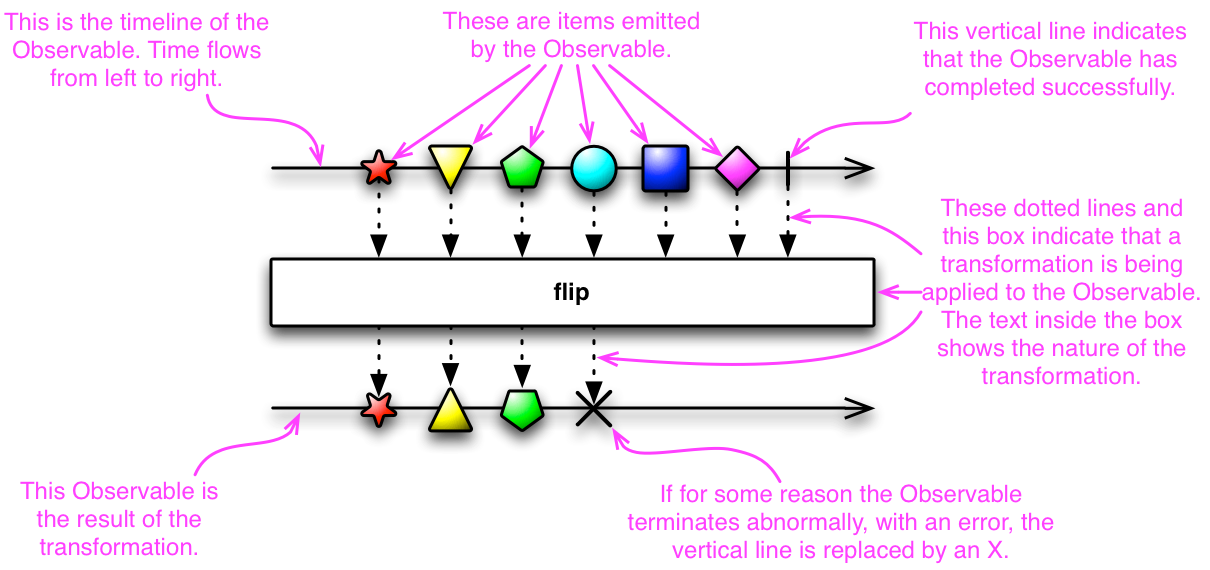
Reactive Java is the library that manages sequences of event by using observable sequences. It is currently implemented by Netflix. Here is the demonstration of the RxJava:

In this example, circular item represents an event where event could be click event, caches, variables, data. It ensures that the event is completed before proceed to the next event. Each events can be modified into new form before proceed to the next action. For example, It applies “Map” function to the observable sequences into new form.

Basic Explanation on Observable

Common Usage of RxAndroid

Lifecycle observable

RxAndroid is able to create a subscription that is bound to lifecycle: OnStart, OnPause and OnResume. It subscribes to an observable on “OnStart” and unsubscribes observable on “onPause” and “onDestroy” lifecycle. It is important to do so to avoid NullPointerException. NullPointerException happens if it tries to update the UI which is already destroyed after stream of events is completed.

Listening observable

Whenever there is rotation of screen, the data and activity will be destroyed. RxJava provides feature that always listening to the background sequence which keeps emitting items, and updating UI components, for example Textviews even after screen rotation or detached from the screen.

Implementation of Lifecycle and Listening observable

In OnCreate, start the sequences.

1
2
3
4
5
6
7
@Override
public void onCreate(Bundle savedInstanceState) {
    super.onCreate(savedInstanceState);

    strings = SampleObservables.numberStrings(1, 50, 250).publish();
    strings.connect(); // trigger the sequence
}

In OnViewCreated of the Fragment, do the subscription. It means whenever the view is created, it will subscribe to an observable and continue to update the UI components i.e. TextView.

1
2
3
4
5
6
7
8
9
10
11
12
13
14
15
16
17
subscription = AppObservable.bindFragment(this, strings).subscribe(new Subscriber<String>() {
  
  @Override
  public void onCompleted() {
      Toast.makeText(getActivity(), "Done!", Toast.LENGTH_SHORT).show();
  }

  @Override
  public void onError(Throwable throwable) {

  }

  @Override
  public void onNext(String s) {
      textView.setText(s);
  }
});

Unsubscribe the observable whenever the view is destroyed/detached due to screen rotation to prevent NPE.

1
2
3
4
5
@Override
public void onDestroyView() {
    subscription.unsubscribe();
    super.onDestroyView();
}

The following code is to bound the subscription to lifecycle.

1
2
3
4
5
6
7
8
9
10
11
12
13
14
15
@Override
protected void onPause() {
    super.onPause();

    // Should output "false"
    Log.i(TAG, "onPause(), isUnsubscribed=" + subscription.isUnsubscribed());
}

@Override
protected void onStop() {
    super.onStop();

    // Should output "true"
    Log.i(TAG, "onStop(), isUnsubscribed=" + subscription.isUnsubscribed());
}

Reference

  1. https://gist.github.com/staltz/868e7e9bc2a7b8c1f754
  2. http://reactivex.io/documentation/operators/map.html
  3. http://reactivex.io/RxJava/javadoc/rx/Observable.html#subscribe(rx.Subscriber)

Black-Box Testing - Robotium

In previous post, it focuses on the white-box testing using Espresso. In this post, I’m going to do Black-box test using Robotium.

What is Black-box Testing?

Black-box testing is a method of the software testing that examines the functionality of an application without peering into its internal structure. For example, in a black-box test on Android application, the tester only knows the inputs and what the expected outcomes should be and not how the program arrives at those outputs.

Demonstration of the Black-box testing

This test focuses on these three main areas: grid view, view pager and navigation drawer. The process of the testing the functionalities is exactly same as the previous post.

Here is the demonstration of test:

Coding

The code is simpler than white-box test using Espresso because it mainly focuses on the input and expected outcomes. Therefore, this test can be done without any knowledge on the codebase of targeted Android application.

1
2
3
4
5
6
7
8
9
10
11
12
13
14
15
16
17
18
19
20
21
22
23
24
25
26
27
28
29
30
31
32
33
34
35
36
37
38
39
40
41
42
43
44
45
46
47
48
49
50
51
52
53
54
55
56
57
58
59
60
61
62
63
64
65
public void testGridView() throws  Exception{
        //Close the dialog and press later button
        solo.clickOnButton("Later");

        //Scroll the 3rd image of view and select it
        solo.scrollListToLine(0,3);
        solo.clickInList(0);
        solo.sleep(1000);

        //Do the swiping
        solo.scrollToSide(Solo.RIGHT);

        //Back to the main screen
        solo.goBack();

        //Scroll the 5th image of view and select it
        solo.scrollListToLine(0,5);
        solo.clickInList(0);
        solo.sleep(2000);

        //Do the swiping
        solo.scrollToSide(Solo.RIGHT);
        solo.sleep(1000);
        solo.scrollToSide(Solo.RIGHT);
        solo.sleep(1000);
        solo.scrollToSide(Solo.LEFT);

        //Back to main screen
        solo.goBack();
    }

public void testNavigationDrawer() throws  Exception{
        //Click on the later button
        solo.clickOnButton("Later");

        //Open and close the drawer
        solo.clickOnActionBarHomeButton();
        solo.sleep(2000);
        solo.clickOnActionBarHomeButton();
        solo.sleep(2000);

        //Open the drawer and select dog category
        solo.clickOnActionBarHomeButton();
        solo.sleep(2000);
        solo.clickOnText("Flickr: Dogs");
        solo.sleep(2000);

        //Open the drawer again and select tutorial
        solo.clickOnActionBarHomeButton();
        solo.sleep(2000);
        solo.drag(300, 300, 1000, 300,2);
        solo.clickOnText("Tutorial");
        solo.sleep(1500);

        //Do the swiping on tutorial screen
        solo.scrollToSide(Solo.RIGHT);
        solo.sleep(1000);
        solo.scrollToSide(Solo.RIGHT);
        solo.sleep(1000);
        solo.scrollToSide(Solo.LEFT);

        //Back to previous activity
        solo.goBack();
        solo.sleep(1500);
}

White-Box Testing- Espresso

One common approach to UI testing is to run tests manually and verify that the app is behaving as expected. However, this approach can be very time-consuming, tedious, and error-prone especially when we run tests on multiple devices. This is where Android Automated Tests becomes useful, it can perform repetitive task without human intervention.

What is White-box Testing?

There are two types tests: white-box test and black-box test. White-box test is method of testing software that tests internal structures or workings of an application. Black-box test is method of examining the functionality of an application without peering into its internal structures or workings. In this project, I did white-box test on my code using Espresso library.

Advantage of Espresso

The advantage of the Espresso is it is have synchronization feature, meaning it waits for UI events in the current message queue to process and default task to complete before it moves on to the next test operation.

Demonstration of the Espresso

I have written test script on animal gallery app. Here are the following steps to verify the functionality of the app:

  1. Launch Animal Gallery app
  2. “Donation” screen will be shown up. Press “Later” button to proceed to main screen

Test on functionality of the grid view

  1. Scrolls to the 3rd image and tap on it.
  2. In full screen viewpager, swipe to the left and view the next image.
  3. Back to the main screen
  4. Scrolls to the 6th image and tap on it.
  5. In full screen viewpager, swipe to the left twice and view the image.
  6. Swipe to the right again to go back the previous image.

Test on functionality of the navigation drawer

  1. Tab on the navigation drawer icon to open the drawer
  2. Search for “Flickr: Dogs” category and tab on it.
  3. Open the drawer again and select “Tutorial” category.
  4. Swipes the tutorial screen.
  5. Done.

Here is the demonstration of the test:

Coding

1
2
3
4
5
6
7
8
9
10
11
12
13
14
15
16
17
18
19
20
21
22
23
24
25
26
27
28
29
30
31
32
33
34
35
36
37
38
39
40
41
42
43
44
45
46
47
48
49
50
51
52
53
54
55
56
57
58
59
60
61
62
63
64
65
66
67
68
69
70
71
72
73
74
75
76
77
78
79
80
 public void testGridView() {
        //Close the dialog and press later button
        onView(withId(R.id.later_button))
        .perform(click());
        onView(isRoot()).perform(waitAtLeast(2000));

        //Scroll the 3rd image of view and select it
        onData(anything())
        .inAdapterView(allOf(withId(R.id.gridview), isDisplayed()))
        .atPosition(2)
        .check(matches(isDisplayed()))
        .perform(click());
        onView(isRoot()).perform(waitAtLeast(2000));

        //Do the swiping 
        onView(withId(R.id.pager))
          .perform(swipeLeft());

        //Back to the main screen
        Espresso.pressBack();

        //Scroll the 5th image of view and select it
        onData(anything())
                .inAdapterView(allOf(withId(R.id.gridview), isDisplayed()))
                .atPosition(5)
                .check(matches(isDisplayed()))
                .perform(click());
        onView(isRoot()).perform(waitAtLeast(2000));

        //Do the swiping
        onView(withId(R.id.pager))
                .perform(swipeLeft());
        onView(withId(R.id.pager))
                .perform(swipeLeft());
        onView(withId(R.id.pager))
                .perform(swipeRight());

        //Back to main screen
        Espresso.pressBack();


}


public void testNavDrawer(){

        //Click on the later button
        onView(withId(R.id.later_button))
                .perform(click());

        //Open and close the drawer
        onView(withContentDescription(getActivity().getString(R.string.drawer_open)))
          .perform(click());
        onView(withContentDescription(getActivity().getString(R.string.drawer_close)))
          .perform(click());

        //Open the drawer and select dog category
        onView(withContentDescription(getActivity().getString(R.string.drawer_open)))
          .perform(click());
        onView(Matchers.allOf(ViewMatchers.withId(R.id.sm_item_title), hasSibling(ViewMatchers.withText("Flickr: Dogs")))).perform(click());

        //Open the drawer again and select tutorial
        onView(withContentDescription(getActivity().getString(R.string.drawer_open)))
           .perform(click());
        onView(isRoot()).perform(waitAtLeast(2000));
        onView(withId( R.id.tutorial)).perform( scrollTo(), click());

        //Do the swiping on tutorial screen
        onView(withId(R.id.tutorial_pager))
        .perform(swipeLeft());
        onView(withId(R.id.tutorial_pager))
                .perform(swipeLeft());
        onView(withId(R.id.tutorial_pager))
                .perform(swipeRight());

        //Back to previous activity
        Espresso.pressBack();
        onView(isRoot()).perform(waitAtLeast(2000));

}

Using Options Menus and Customized Dialogs for User Interaction

In this task, there will be additional features shown in search results, including movie overview and option menu. The option menu allows user to choose to view the full image and imdb website of movie.

First of all, when user types name of the movie into text. The search result will be shown on the next page.
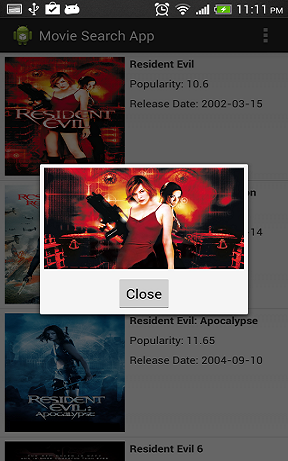
When user clicks on the one of the movies in the listview, there will be a pop-up screen and shows the user the overview of the movie. When the user selects movie, the position of the selected movie in listview is recorded. Therefore, once the user clicks on the menu, there are two options that allow user to choose: Imdb cover image and Imdb URL.
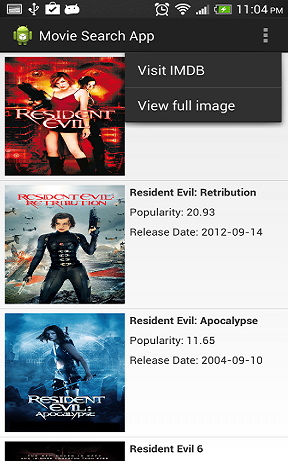
Once user click on the “View full image”, the following content will be shown.

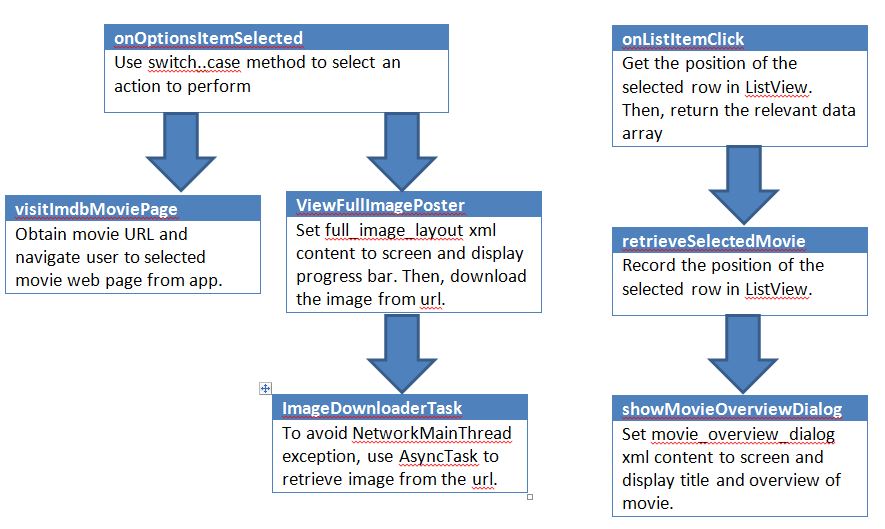
The purpose of MovieListActivity class is to create options menus and customized dialogs for user interaction. The explanation of coding of method in MovieListActivity class is shown in the chart below.

Customized List View for Data Presentation

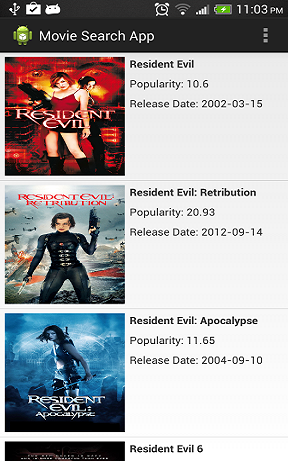
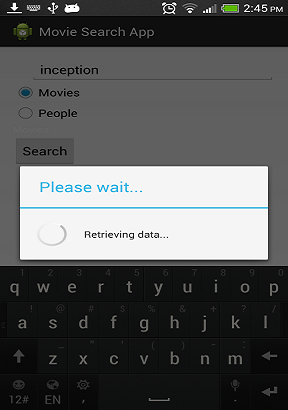
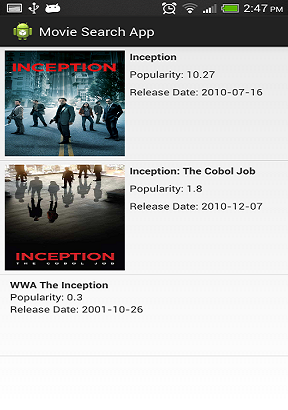
In this task, there will be poster, release date and popularity shown in search results as shown in the examples below. First of all, user types name of movie into text box and then click on “Search” button. Progress bar with ‘Retrieving data…“ will be shown.

Next, the relevant search results will be shown on the next page with information: poster, release data, and popularity.

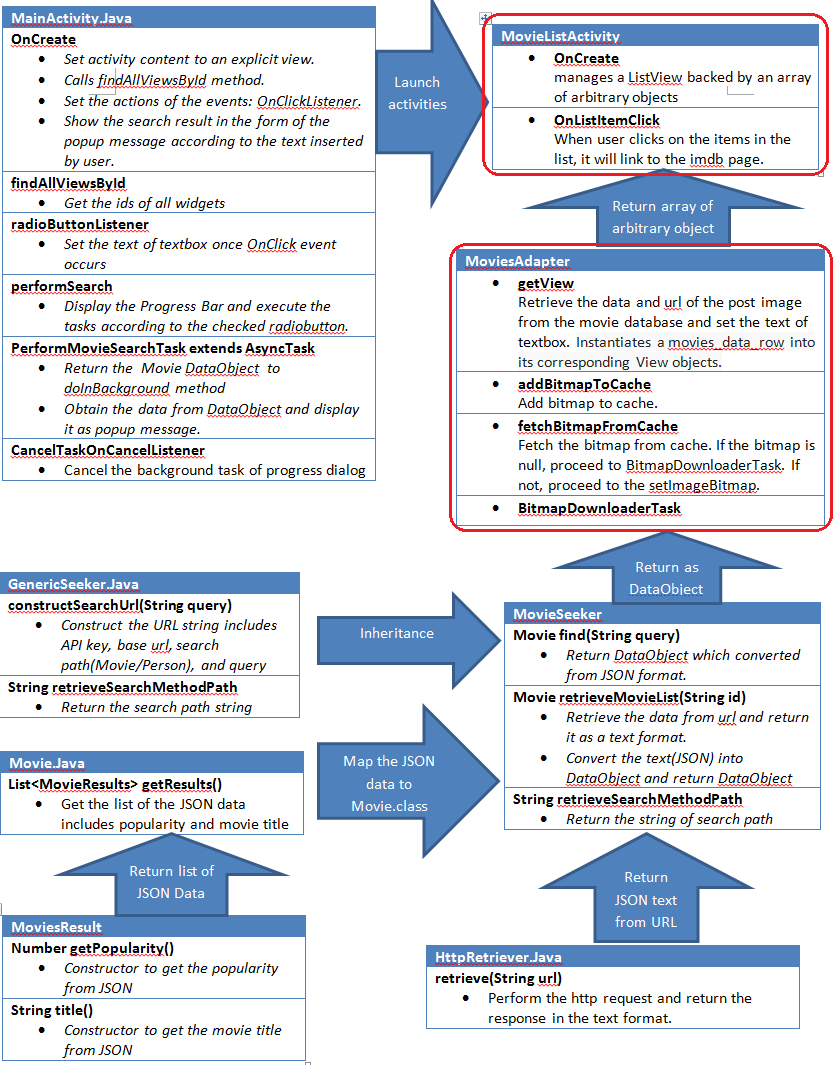
In order to perform this task, there are two classes will be added into the coding. The explanation of the coding is shown in the figure below. The newly added classes is indicated in red circle.

TroubleShoot of the Movie Search App

My initial attempt was to extract the JSON data from the movie database using API key. All the JSON data is displayed in LogCat instead of displaying the JSON data in the app. First of all, I have modified the coding in the AndroidManifest xml file that is from:

android:name="com.example.moviesearchapp.MainActivity"

to

android:name="com.example.moviesearchapp.MainActivityDev"

The purpose of the changing the name of the activity is to test the workability of the small part of the coding of Movie Search app using MainActivityDev JAVA script. In MainActivityDev.java, JSONReader.readJsonFromUrl command is used to get JSON Text format from the movie database URL. The GSON library is used to convert the JSON data to Java DataObject, then, display it in the LogCat window by using the command as shown below:

Log.d("test",obj.getResults().get(0).getId().toString());

In Log.d, “test” is a tag which will be presented in the LogCat window along with the string “obj.getResults(). get(0).getId().toString()”. If there are any error or exception, ‘Log.e’ will be used to display the error message in the window. The code of MainActivityDev.Java is shown below.

public class MainActivityDev extends Activity {
@Override
public void onCreate(Bundle savedInstanceState) {

    super.onCreate(savedInstanceState);
    setContentView(R.layout.activity_main);
    final Gson gson= new Gson();

    new Thread(new Runnable() {
        public void run() {
            try {
                 String json = (String) JSONReader.readJsonFromUrl("https://api.themoviedb.org/3/search/movie?" +
                        "api_key=e3deb5d586800ccb02c69aaad8f66562&query=inception");

                 Movie obj = gson.fromJson(json, Movie.class);
                 Log.d("test",obj.getResults().get(0).getId().toString());

                 json = (String) JSONReader.readJsonFromUrl("https://api.themoviedb.org/3/movie/" 
                         + obj.getResults().get(0).getId().toString() + 
                         "?api_key=e3deb5d586800ccb02c69aaad8f66562");

                 ImdbMovie imdbData = gson.fromJson(json, ImdbMovie.class);
                 Log.d("test",imdbData.getOverview().toString());

            } catch (IOException e) {
                Log.e("test", e.getMessage());
            } catch (JSONException e) {
                Log.e("test", e.getMessage());
            }

        }
    }).start();

Movie Searching App- Coding Explanation

There are five packages in this app as shown in the figure below. In each of these packages, it contains classes as follows:
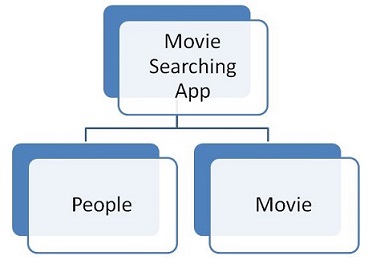
  1. MovieSearchingApp package
    • MainActivity.Java
  2. IO package
    • FlushedInputStream.Java
  3. Model package
    • Movies.Java
    • MoviesResult.Java
    • Person.Java
    • PersonResult.Java
  4. Services package
    • GenericSeeker.Java
    • MovieSeeker.Java
    • PersonSeeker.Java

In order to explain the purpose of class and package and also show the interaction between the package and classes, the chart was constructed as shown in the figure below.

Movie Searching App- Online Searching Function

Basically, there are two types of search in this app: Movie and Person.

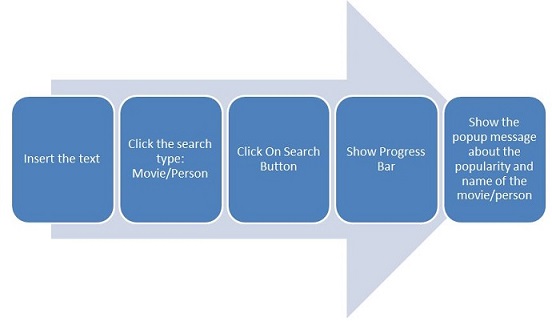
The flowchart on how movie searching app works is shown in the figure below.

There are two additional features that I have added in the android applications: Progress Bar and Online Searching function. The Progress Bar is the indication of the progress of retrieving the JSON data from the URL. The online searching function includes retrieve the data from the URL and convert the JSON format to JAVA Object using GSON library. There were problems I have encountered in the process of completing the task as shown below.

1)Problem: API of movie database was upgraded to version 3, therefore, all the data is presented in JSON format instead of XML format

Solution: Use the GSON libray to convert JSON format into Data Object and display relevant data in the form of pop-up message at the bottom of the app.

2)Problem: Method to acquire the data from the movie database

Solution: Acquire API key of the movie database. Construct the URL with API key in order to obtain JSON data.

3)Problem: NetworkOnMainThread Exception occur while retrieving data from database

Solution: Async task was used to solve the “NetworkOnMainThread” exception error.

The operation of app is explained and the result of the movie searching app is shown as follows:

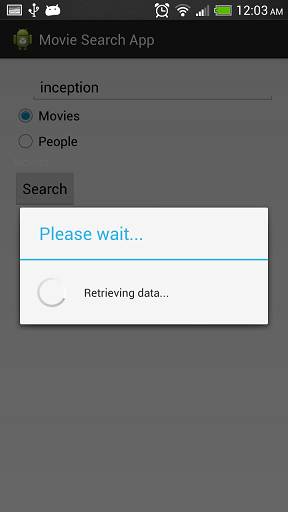
First of all, with movie-search type, the text “inception” was entered as shown in the figure below. The progress bar is shown while obtaining the data from the url after user clicks on the “Search Button”.

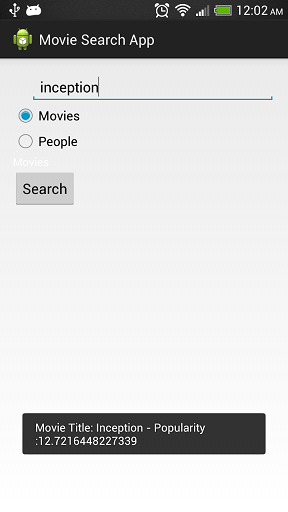
After data is obtained, the movie title and popularity are shown in the pop-up message.

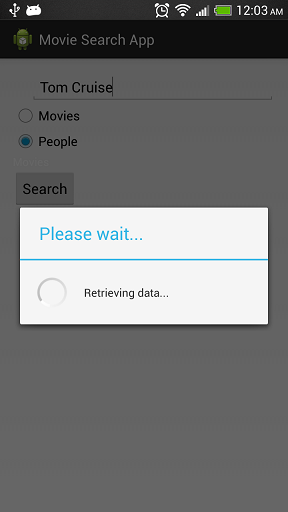
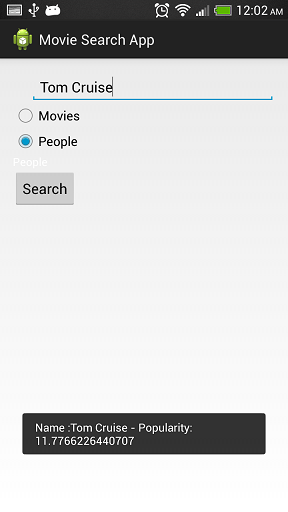
For person-search type, the operation is same as the movie-search type as shown in the figures below.

In the next blog, I will discuss about detail description of structure of coding and ways to troubleshoot the bug of the app.

Movie Searching App

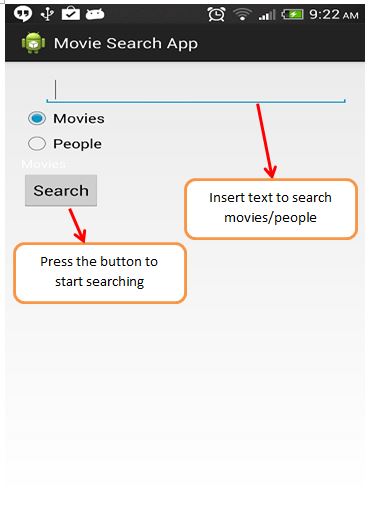
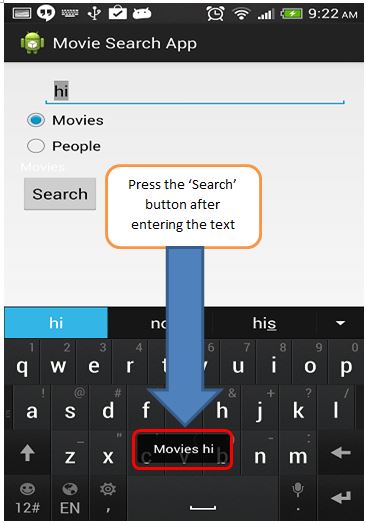
Movie Search Android Application was created. Figures below show screenshots of the UI of the android in order to have clear on picture on the functions of the app.

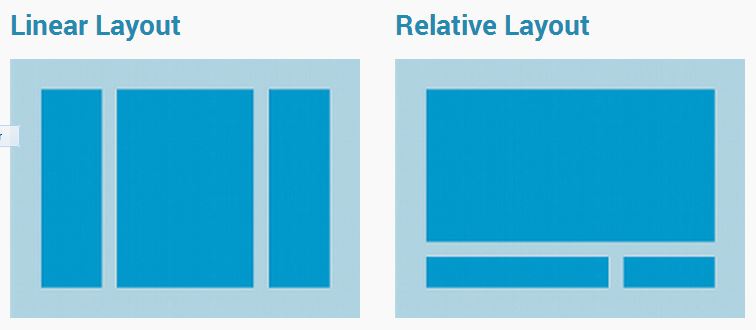
In the initial development, Toast method was used to show the popup message after pressing the search button. There are two types of layout: relative layout and linear layout.

In activity_main.xml code, the ‘RelativeLayout’is changed to the ‘LinearLayout’. The layout is set in vertical orientation as shown in the figure below.

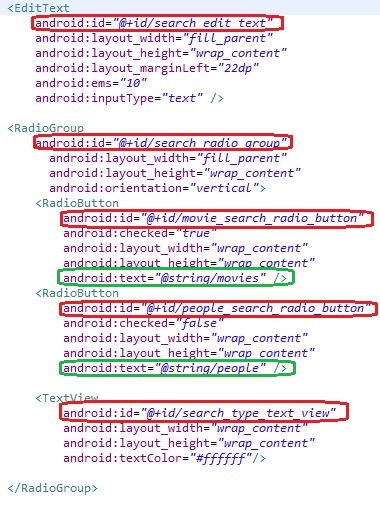
A radiogroup was created to allow user to choose the options either movie or people. First of all, the id of the radiobuttons are set as shown below. The red circles is id of the widgets whereas the green circle is the text of the widgets.

A button was created to allow user to search for a movie or people once user clicks on it.

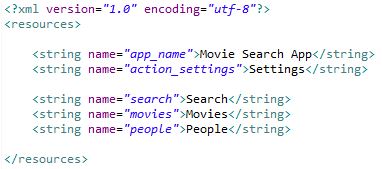
All the text of the widgets was set in string.xml which is important for localization.

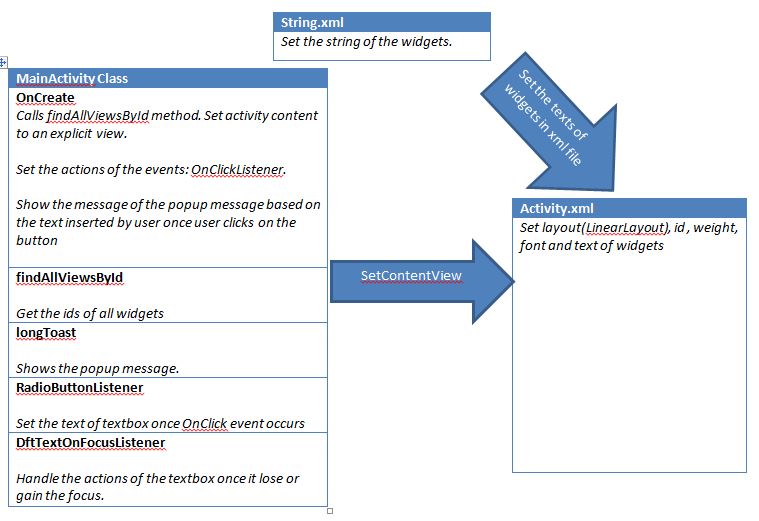
To shows the relationship between the MainActivity java and the xml file, the figure was drawn as shown in the figure below.